Chicken Coop Plans: A Raised 4 × 4 ft Coop for 4 Hens
Coopgauge is reader-supported. When you buy through links on this page, we may earn a commission.
This plan builds a raised coop with a 48 × 48 in floor. That is 16 sq ft, enough for 4 standard hens at 4 sq ft each. The house sits 24 in off the ground, and a 4 × 8 ft run bolts to one side.
- Footprint
- 4 × 4 ft house, 4 × 8 ft run
- Hens
- 4 standard (16 sq ft floor)
- Roost length
- 48 in (8 in per hen, room for 6)
- Nest boxes
- 1 to 2, each 12 × 12 × 12 in
- Floor height
- 24 in off the ground
- Materials (key)
- 2 × 4 lumber, ¾ in and ½ in plywood, ½ in hardware cloth
Floor: 4 hens × 4 sq ft (Minnesota Extension range). Roost: 8 in per hen. Box size and height: Oregon State. Frame sizes: our drawing.
We drew this plan around the extension numbers, not a kit photo. Four hens get 16 sq ft inside and 32 sq ft of run. The single roost bar is 48 in long, so a fifth or sixth hen still has a perch. The floor sits 24 in up, which leaves a dry, shaded patch under the house.
Oregon State suggests raising a coop at least 1 ft off the ground. That keeps rats and snakes from living under the floor. At 24 in, you can also rake under it without crawling.
This is a weekend build for two people with basic tools. Day one covers the floor, legs and walls. Day two covers the roof, vents, doors and fittings. Nothing in the plan needs a table saw or joinery.
The plan fits on a 4 × 4 ft patch of level ground plus the run. Pick a spot with shade in the afternoon and good drainage. Penn State suggests high, dry ground and a front that faces south.
Dimensions
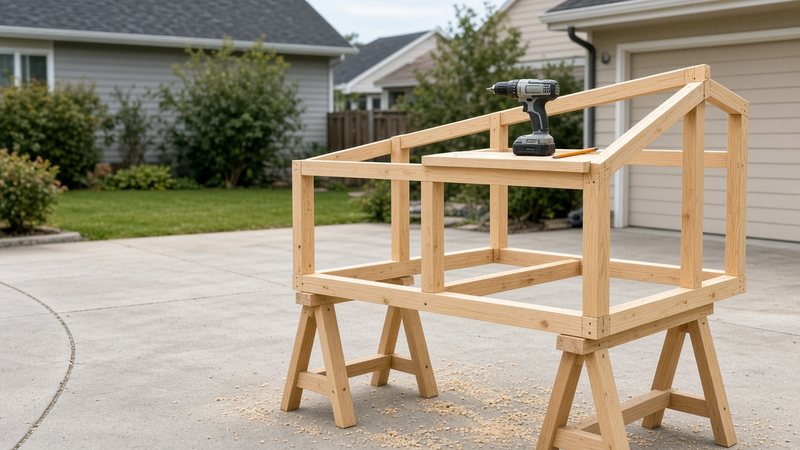
The front wall is 48 in and the back wall 36 in. That 12 in drop over 4 ft sheds rain to the back. Put the people door on the front, so you never reach over the roost to collect eggs.
The people door can take most of the front wall. A 36 in wide door lets you rake out bedding in a few strokes. Cut the pop door for the hens on a side wall, low, with a short ramp down to the run.
Oregon State sets roosts 2 ft off the floor and says to keep nest boxes off the ground and not lower than the roosts. Penn State adds that nests belong away from the roosts. So the roost runs along the back wall at 24 in. The box sits on the far side at the same height.
Keep every perch under 4 ft. Penn State warns against any perch more than 4 ft above the floor, because hens land hard when they jump down. Our tallest wall is 48 in, so no ledge inside comes close.
Give the nest box a sloped lid. Oregon State suggests a roof at 45 degrees, so hens cannot sleep on top of the box. Add a short landing bar in front of the box opening. Hens hop onto the bar first, then step in.
Cut list
| Part | Qty | Size (in) | Material |
|---|---|---|---|
| Floor frame, long sides | 2 | 48 | 2 × 4 |
| Floor frame, short sides | 2 | 45 | 2 × 4 |
| Legs | 4 | 24 plus wall height | 2 × 4, doubled |
| Front wall studs | 3 | 45 | 2 × 4 |
| Back wall studs | 3 | 33 | 2 × 4 |
| Top plates | 2 | 48 | 2 × 4 |
| Floor panel | 1 | 48 × 48 | ¾ in plywood |
| Front and back walls | 2 | 48 × 48 and 48 × 36 | ½ in plywood |
| Side walls | 2 | 48 wide, 48 to 36 tall | ½ in plywood |
| Roof panel | 1 | 54 × 54 | ½ in plywood plus roofing |
| Roost bar | 1 | 48 | 2 × 2, top edges rounded |
| Nest box | 1 to 2 | 12 × 12 × 12 | ½ in plywood |
Cut the long floor rails at 48 in and the short rails at 45 in. The short rails fit between the long ones, so the frame comes out at 48 × 48 in. A 2 × 4 is 1.5 in thick, and two of them take 3 in off the 48 in side.
The roost is a 2 × 2 with the top edges rounded. Oregon State calls for 1 to 2 in square lumber with rounded edges, and says round dowels are worse. A 2 × 2 is 1.5 in across, right in that band.
Buy one extra 2 × 4 beyond the list. A warped stud is common, and the spare saves a second trip. Lay every board flat on the ground before you cut, and set aside any with a bad bow.
Mark each part with a pencil as you cut it. The front studs at 45 in and the back studs at 33 in look alike on a pile. A letter on each end keeps the walls straight when you frame them.
Expect waste of about one stud and part of one plywood sheet. Saw kerfs, a bad knot and a cut made on the wrong line all add up. The list above already allows for that.
Keep every offcut until the build is done. Short 2 × 4 pieces become blocking for the roost bar and the nest box. Plywood strips become door stops and trim around the vents.
Lay out the run before you finish the house. The run in this plan is 4 × 8 ft. It has a frame of 2 × 4s. Wrap ½ in hardware cloth on all sides and the top. A full roof of mesh keeps hawks out. A solid roof over one end gives shade and a dry patch in rain.
Cut slowly. Check each part. Then fix it in place. Rushing costs more time than it saves. A wrong cut on plywood means a trip back to the store for a full sheet.
The plywood list is generous on purpose. Four sheets of ½ in cover the walls, the roof and one nest box with offcuts to spare. Use the offcuts for the nest box lid, the ramp and a droppings board under the roost.
Materials & tools
| Item | Qty | Use |
|---|---|---|
| 2 × 4 × 8 ft studs | 10 | Frame, legs, plates |
| 2 × 2 × 8 ft | 1 | Roost bar and nest perch |
| ¾ in plywood, 4 × 8 ft | 1 | Floor (half sheet left over) |
| ½ in plywood, 4 × 8 ft | 4 | Walls, roof, nest box |
| ½ in hardware cloth, 48 in wide | 50 ft roll | Vents, run walls, apron |
| Spring-loaded bolt or two-step latch | 2 | Coop door and run door |
| Exterior screws and fender washers | 1 box each | Frame and mesh |
| Roofing (shingles or metal) | 20 sq ft | Roof |
- Drill and driver
- Circular saw
- Tin snips for mesh
- Tape measure and speed square
- Staple gun (for holding mesh in place before you screw it)
Fasten mesh with screws and fender washers along every frame member. Staples alone hold the mesh in place while you work, not for good. Each door needs one bolt or latch that takes two motions to open.
Pick exterior-grade screws for every joint that sees weather. Use 2½ in screws for the frame and 1¼ in screws for plywood. Fender washers spread the load on mesh, so the wire does not tear out at the screw.
Build steps
- Build the floor frame from 2 long and 2 short rails. Measure both diagonals; they match when the frame is square.
- Fix the 4 legs inside the corners. Set the floor top at 24 in above the ground.
- Screw the ¾ in floor panel to the frame. Seal the edges if the coop sits in wet ground.
- Stand the front wall at 48 in and the back wall at 36 in. Add the side panels cut on the slope.
- Leave a 4 in gap along the top of the front and back walls. Cover it with hardware cloth for the vent.
- Fit the roof panel with a 3 in overhang. Add roofing over it.
- Mount the roost 24 in above the floor and 10 in or more from the back wall. Mount the nest box on the far side, with its floor at 24 in, level with the roost.
- Hang the doors and fit a bolt or two-step latch to each one.
Plan on two people for the walls and roof. The 54 × 54 in roof panel is awkward to lift alone. Pre-drill every screw near a board end so the 2 × 4s do not split.
Work in the order shown. Each step sets up the next, and the frame stays square from start to finish.
Use sliding windows, not ones that swing. Penn State notes that hens roost on a swinging window. A slide also stays shut in wind. Put the window on the south or east side, the side Penn State calls usually best for openings.
Slope the floor a little toward the door if you plan to hose it out. Penn State gives that tip so water drains out and the floor dries faster. On a raised coop, one leg cut a touch shorter does the job.
Paint or seal the outside before the hens move in. Oregon State notes that wood coated in latex paint is easy to clean. Leave the inside bare or paint it too, but let it dry fully first.
Add bedding last. A layer of pine shavings on the floor and in the nest box is enough to start. Our nesting box page covers box bedding and placement.
Predator-proof details
Use ½ in hardware cloth on every opening and on the run, not chicken wire. Kentucky Extension notes that a least weasel fits through a ¼ in gap. Where weasels or mink live near you, use ¼ in mesh on the coop vents.
Bury the run mesh at least 12 in. Penn State also bends the bottom 6 in outward, so a digging animal meets more wire. Our full checklist is on the predator-proof coop page.
Close the coop door at dusk every night. An open door at night undoes every other detail in this plan. An automatic door on a timer or light sensor takes the job off your list.
Check the coop once a season. Walk around it and press on the mesh at each corner and vent. Look for gaps where wood has shrunk or a screw has worked loose. Tighten what you find before a fox finds it.
Replace the bedding as it packs down. A fresh layer once a week, and a full clean-out a few times a year, keeps the coop dry. A dry coop smells better and keeps the wood sound for longer.
Watch the ground at the run edge. A shallow dip along the wire often means something has started to dig. The buried apron stops it, but filling the dip keeps the next try from starting in the same place.
Common Questions
How many chickens fit in a 4 × 4 coop?
Four standard hens at 4 sq ft each. Bantams need about 2 sq ft each, so 8 bantams fit. Large breeds such as Orpingtons need about 5 sq ft, so 3 fit. The run in this plan adds 8 sq ft per standard hen.
How high should a chicken coop be off the ground?
Oregon State suggests at least 1 ft. We draw 24 in, which gives you room to reach under the house and keeps the floor dry. Lower it for Silkies and other bantams that do not jump well, or add a ramp.
How much does the lumber list come to?
Ten 2 × 4 studs, one 2 × 2, one sheet of ¾ in plywood and four sheets of ½ in plywood. Add a 50 ft roll of ½ in hardware cloth for vents, run walls and apron. Prices change too often to list here.
Read next
Sources
- University of Minnesota Extension, Raising chickens for eggs (reviewed 2025): extension.umn.edu (3 to 5 sq ft indoor space per bird)
- Oregon State University Extension, EC 1644 Backyard chicken coop design (2014, reviewed 2023): extension.oregonstate.edu (box roof at 45 degrees and a landing pole; raise the coop at least 1 ft; roost poles 2 ft up, 10 in apart, 1 to 2 in square lumber; nest boxes 12 × 12 × 12 in, not on the ground or lower than roosts)
- University of Kentucky, ID-245 Predator Management for Small-scale Poultry Enterprises: publications.mgcafe.uky.edu (least weasel through ¼ in; bury hardware cloth at least 12 in)
- Penn State Extension, Small Scale Poultry Housing (updated 2026): extension.psu.edu (bury 12 in, toe outward about 6 in; no perch over 4 ft; sliding windows; openings south or east; slope floor to the door)
- Frame sizes, cut list and quantities: our drawing for this page (lumber at nominal sizes; a 2 × 4 is 1.5 × 3.5 in).
- Barrel bolt length and pack size: maker listing on Amazon, ASIN B07H663KLY, read 2026-10-12
How we pick and check numbers: How we research.