Brooder Setup: Heat, Space and a Week-by-Week Schedule
Coopgauge is reader-supported. When you buy through links on this page, we may earn a commission.
Set the heat to 95°F at chick level for week 1, then drop it 5°F each week until you reach 70°F. Give each chick 0.5 sq ft of floor to 4 weeks and 1 sq ft from 4 to 8 weeks. Start the heat 24 hours before the chicks arrive.
- Temp, week 1
- 95°F at chick level
- Weekly drop
- 5°F, down to 70°F
- Floor, 0 to 4 weeks
- 0.5 sq ft per chick
- Floor, 4 to 8 weeks
- 1 sq ft per chick
- Litter
- 2 to 4 in of dry pine shavings
- Pre-heat
- 24 hours before arrival
Temperature schedule, floor space, litter and pre-heat: University of Maine #2219 and University of Missouri G8351.
A brooder is a warm, safe pen for chicks until they grow feathers. It needs four things. Heat. Space. Litter. Easy feed and water. Get those right, and chicks spend their first weeks eating, sleeping and exploring.
The two extension guides we follow agree on the core numbers. University of Maine and University of Missouri both start at 95°F and drop 5°F a week. Both give 0.5 sq ft per chick for the first 4 weeks. That makes the setup simple to plan.
Set up a day early. Missouri says to run the brooder for at least 24 hours before the chicks arrive. That warms the litter and gives you time to check the thermometer. If anything is off, you find out before the box of chicks is on your kitchen table.
Pick a quiet spot with no drafts. A spare room, a garage corner or a shed with power all work. Keep pets out. Chicks are loud for their size, so pick a room where the peeping will not keep anyone up.
Setup
| Item | Size or amount | Note |
|---|---|---|
| Brooder box or pen | 0.5 sq ft per chick, then 1 sq ft | 20 chicks: 10 sq ft, then 20 sq ft |
| Heat source | heat plate or 250 W lamp | One 250 W lamp per 50 to 75 chicks |
| Litter | 2 to 4 in pine shavings | Not hardwood shavings or hay |
| Thermometer | at chick level | 2 to 3 in above the floor |
| Feeder | 1 in of space per chick to 4 weeks | Start with a cut-down box lid |
| Waterer | 1 quart jar per 16 chicks, week 1 | Clean daily |
| Guard ring | 12 in tall | Keeps chicks near heat for the first week |
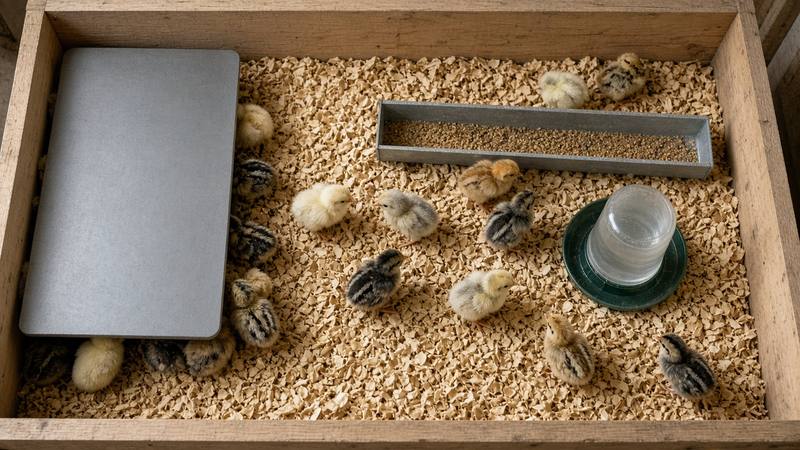
Put the heat at one end and the feed and water at the other. Chicks then choose their spot. University of Maine says chicks that huddle under the heat are cold, chicks spread evenly are comfortable, and chicks that stay away from the heat are too warm.
Use pine shavings or a similar dry, absorbent litter. University of Maine says 2 to 4 in of clean, dry litter works and that hardwood shavings and hay do not. Missouri suggests 3 to 4 in. For the first few days, rough paper over the litter helps chicks find their feet; Missouri says to use crinkled paper, not smooth.
Heat plates and heat lamps both work. A heat plate warms chicks from above at close range, like a hen. The plate above lists 20 chicks, with 25 height settings from 1 to 9 in. A lamp warms the whole area under it. Missouri suggests one 250 W lamp for each 50 to 75 chicks, hung 1 to 1.5 ft above them to start.
Plates use far less power. This one lists 22 W against 250 W for a lamp bulb. A lamp, though, is easy to raise and lower as chicks grow. Our heat lamps and plates page compares both by chick count.
Feed and water need a little thought on day one. University of Maine suggests feeding from cut-down cardboard boxes for the first week to 10 days, with sides about 1¼ in high. After that, use a chick feeder with room for all of them to eat at once. Fill it no more than half full.
For water, University of Maine gives one 1 quart jar waterer per 16 chicks in the first week. Set it on a small block so litter stays out. Clean it every day. Our chick starter feed guide covers what goes in the feeder.
Week-by-week
| Week | Temp at chick level | Floor per chick | Change this week |
|---|---|---|---|
| 1 | 95°F | 0.5 sq ft | Guard ring in place |
| 2 | 90°F | 0.5 sq ft | Remove the ring after about 7 days |
| 3 | 85°F | 0.5 sq ft | Raise lamp about 3 in |
| 4 | 80°F | 0.5 sq ft | Raise lamp about 3 in |
| 5 | 75°F | 1 sq ft | Low roost, 4 in per chick |
| 6 | 70°F | 1 sq ft | Heat off on warm days |
| 7 to 8 | 70°F or room | 1 sq ft | Heat until well feathered |
Each week has one small job. Drop the heat 5°F. With a lamp, Missouri suggests 18 in above the chicks in the first week, then raising it about 3 in each week. With a plate, raise it one notch as the chicks grow taller.
Missouri says to take the guard ring away after about a week. At 4 to 6 weeks, add a low roost with 4 in of space per chick. Missouri says to keep heat on until the chicks are well feathered. University of Maine adds that you can turn the brooder off on warm days near the end.
Space doubles at 4 weeks. Twenty chicks need 10 sq ft to 4 weeks, then 20 sq ft to 8 weeks. University of Maine lists 2 sq ft per bird from 8 to 12 weeks. Plan the bigger pen before you need it, since chicks grow fast in weeks 3 and 4.
Watch the chicks as well as the dial. The numbers are a starting point. If chicks crowd under the heat, it is too cool. If they press against the far wall, it is too warm. Adjust a little at a time.
Chicks tell you fast. Spread out and busy is right. Quiet and calm at night is right. Loud and bunched is not. Change one thing, wait an hour, then look again.
Calibrate your thermometer
- Fill a glass with crushed ice and add clean water. Stir.
- Hold the thermometer probe at least 2 in into the ice water, not touching the glass.
- Wait at least 30 seconds. It should read 32°F.
- If it reads high or low, adjust it per the maker, or note the difference and allow for it.
- Hang it 2 to 3 in above the litter, at the outer edge of the heat.
The ice-water check comes from the USDA food thermometer guidance, and it works for any probe or dial thermometer. A reading of 34°F in ice water means your thermometer reads 2°F high. Subtract that from every brooder reading.
Place the thermometer where the chicks are, not where you stand. University of Maine measures at chick level, 2 to 3 in above the floor. Missouri suggests hanging it about 3 in inside the outer edge of the hover. Check the reading twice a day in the first week.
Digital thermometers with a remote probe are handy here. The display sits outside the brooder, and the probe sits at chick level. Check it against ice water once before the chicks arrive. Check it again if a reading ever looks odd.
Equipment troubleshooting
| Problem | Likely cause | Fix |
|---|---|---|
| Temperature drifts high | Lamp too low, room warming up | Raise the lamp or plate a little |
| Temperature drifts low | Draft, cold room, lamp too high | Block drafts at chick level; lower the heat |
| Reading does not match the chicks | Thermometer off or in the wrong spot | Ice-water check; move it to chick level |
| Power cut | Outage or tripped circuit | Plug into a separate circuit; keep a spare bulb |
| Wet litter near water | Waterer overfilled or tipped | Raise the waterer on a block; replace damp litter |
Temperature drift is the most common equipment issue. A room that warms up on a sunny afternoon pushes the brooder past its target. Raise the lamp or plate a little and check again in an hour. On cold nights, block drafts at chick height with cardboard around the pen.
Missouri says to secure the lamp reflector firmly, keep it clear of other objects and keep water off the bulb and cord. Use the clamp and the chain or hook that comes with the lamp, not the clamp alone. A spare bulb in the drawer covers a burned-out lamp at night.
The lamp above has a ceramic socket rated for bulbs up to 250 W. The reflector is 10.5 in, with a double wire guard. The bulb is sold apart.
Missouri suggests one 250 W lamp for each 50 to 75 chicks, hung 1 to 1.5 ft up to start. A plate at 22 W suits up to 20 chicks. Use the lamp when the pen is wider than one plate.
Keep the litter dry. Missouri suggests stirring it so it does not pack, and moving the feeder and waterer now and then. Lift out any wet patches and add fresh shavings. Dry litter keeps the brooder warm and the chicks clean.
Plan for a power cut before it happens. Keep the brooder in a room that stays above freezing. Know where a spare bulb or a second plate is. Write down the circuit the brooder is on. Then you know which breaker to check first.
By week 8, most chicks are ready for the coop on mild days. Move them once they are fully feathered and the nights stay warm enough.
Common Questions
What temperature should a brooder be for chicks?
95°F at chick level for the first week, then 5°F lower each week until 70°F. That is the schedule from University of Maine and University of Missouri.
How much space do chicks need in a brooder?
About 0.5 sq ft per chick to 4 weeks, then 1 sq ft to 8 weeks. Twenty chicks need 10 sq ft at first and 20 sq ft later.
How long do chicks need a heat lamp?
Until they are well feathered, usually around 6 weeks at the 70°F step. University of Maine says you can switch the heat off on warm days near the end.
Heat plate or heat lamp?
Both work. A plate uses far less power and gives chicks a warm spot like a hen. A lamp heats a wider area and is easy to adjust by height.
Read next
Sources
- University of Maine Cooperative Extension, Bulletin #2219 Giving Chicks a Good Start: extension.umaine.edu (95°F at chick level, 2 to 3 in up, week 1; minus 5°F a week to 70°F; heat off on warm days; 2 to 4 in litter, no hardwood shavings or hay; pre-heat 24 hours; floor 0.5, 1, 2 sq ft; feeder 1 in per chick to 4 weeks; 1 quart jar per 16 chicks)
- University of Missouri Extension, G8351 Brooding and Growing Chicks: extension.missouri.edu (95°F then minus 5°F a week; 0.5 then 1 sq ft; 250 W lamp per 50 to 75 chicks, 1 to 1.5 ft up, 18 in in week 1, raise 3 in a week; guard ring 12 in, removed after about 7 days; 3 to 4 in litter; crinkled paper; roost 4 in per chick at 4 to 6 weeks; heat until well feathered; thermometer at the hover edge)
- USDA Food Safety and Inspection Service, Food Thermometers (ice-water check): fsis.usda.gov (ice water reads 32°F; probe 2 in deep; wait 30 seconds)
- Plate size, chick count, height settings and wattage: maker listing on Amazon, ASIN B07CJMV8XG, read 2026-10-12
- Ceramic socket, up to 250 W, 10.5 in reflector, double wire guard: maker listing on Amazon, ASIN B00D458L9K, read 2026-10-12
How we pick and check numbers: How we research.